I was inspired to write this post by the super awesome DBA, Jonathan Kehayias of sqlskills. He has a great series of articles on setting up a home lab using virtualbox and evaluation software from Microsoft available as free downloads. Check out his articles on sqlskills.
If you are on this page and reading this, chances are that you already know what AlwaysOn is so I am not going to explain it again.For a quick overview of this new High availability/disaster recovery solution, go read this article. Now lets get started with building our lab.
What do you need?
In order to follow this tutorial, you need the following
The latest version of VirtualBox
Windows server 2008 R2 with sp1, evaluation edition
SQL Server 2012 Evaluation edition
Coming to the hardware, you need a decent laptop/desktop with 8 GB RAM and a good processor (may be core i5). You can try with lesser RAM too, but things will be a little slow. You need at least 4 VMs to test a basic setup of AlwaysOn. The server that acts as a domain controller can not be a part of availability groups. Don't worry about storage for all these VMs, because we are going to use linked clones that make use of resources from a base VM.
Creating a base VM
I assume you've already installed virtualbox by now. Launch VirtualBox and create a new VM. Give it a name you please. May be SQLBASEVM?

I am going to assign 2 GB of RAM to the base VM because we are going to perform windows server installation and I want it to be fast. You may later adjust the amount of RAM based on your available resources from settings.


Now you need to add Windows server installation .ISO file you downloaded to the base VM. We will later boot from this ISO and install Windows server.

Now we are all set to install Windows. Go ahead and start the VM and install Windows 2008 R2 with sp1. Once done, logon to the machine and the first thing that you should do it to install guest additions on your new VM. This allows you to have a smooth user experience and enhance performance. Here is a link that explains how to do it.

You may have to reboot the VM after installing guest additions. It is now time to add required features and roles to our base VM. We will be creating multiple machines that will act as Domain controller, SQL Servers and adding features like .net framework, Active directory services and failover clustering will save us a lot of time down the line. SQL Server's AlwaysON Aavailability Groups is built on top of Windows Failover Clustering platform and it is a pre requisite. Add the following features and roles:
.NET Framework 3.5.1
Failover Clustering
Multipath IO (This is not required for AlwaysOn, but if you want to test clustering using the same base VM, enable this)
Active Directory domain services role
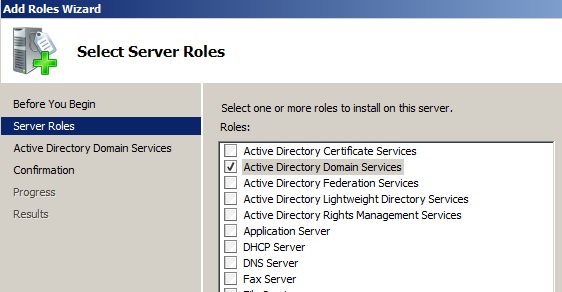

Install these and shutdown the VM. Don't boot it yet.
Network Adapters
We need to enable network adapters for the base VM. If you care about accessing internet from inside VMs, you can leave the default network adapter. It will usually be attached to NAT. We need one more network adapter to simulate the domain network for other servers that will form the availability group. Enable a network adapter by right clicking on the VM => settings => Network => Adapter2. Attach it to Internal network and call it "Domain Network"

One last step before we can create clones from the base VM is to generalize the VM to provide new like experience for all the clones. We can use sysprep for that. Now start the Base VM, login to the server, go to RUN => type sysprep. It will take you to C:\Windows\System32\Sysprep. Run sysprep exe as an Admin. Select the options in below pic. Make sure Shutdown option is selected, not reboot:

Creating Clones
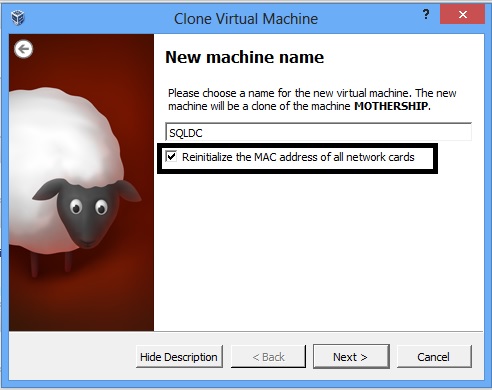
We have the base VM ready and we can now get down to real business of setting up our test environment. On VirtualBox, right click on the base VM and click "Clone"

In the next dialog box, name your VM and make sure that you select re-initialize mac address for all network cards. Failing to do this will result in issues when we add these VMs to a cluster and perform validation tests. Also, make sure that it is a Linked clone, not Full Clone.

Repeat these same steps for three more linked clones from base VM and give them appropriate names. In the end, you should have 4 linked clones. I have the following:
SQLDC - Domain controller
SQL01 - Primary SQL Server
SQL02 - SQL Secondary 1
SQL03 - SQL secondary 2
Configuring Domain Controller
If you have followed this demo so far, you'll recollect that we gave 2 GB RAM to the base VM. All the clones created from the base will inherit this and you should adjust your value to fit your available resources. I prefer to grant more RAM to the server, configure it and then change it back to a lesser value after configuring. This way, installations and setup will be faster. Since a domain controller doesn't do much, you can grant somewhere between 700 MB to 1024 MB after initial setup.
Start SQLDC (or your domain controller VM) and log on to the server. It will prompt you to set an Admin password - go ahead and do that. Go to start and type 'dcpromo'. Find the rest of the instructions in these pictures below. Click on the pic to enlarge it.


Select that the computer will assign IP addresses automatically. Say Yes to the next dialog box and choose a Domain Administrator password. Reboot VM after domain setup. When the system starts again, use your domain admin account and password to login. In my case, the domain is TESLA (named after the greatest scientist ever, not the car company). I login using TESLA\Administrator, my password. After reboot, go to Server Manager and Configure network. If you made no changes to the setup and followed this tutorial as is, you will see two network adapters on your VM. One attached to NAT and one for Domain networking. You need to figure out which of them is the domain network adapter because we are going to make some changes to it. The easy way to do it is by simulating a cable disconnection. Keep the VM running in a windows. Go to VirtualBox and right click on SQLDC VM. Go to network. Under adapter 2, you'll see Domain Network connection. Click on Advanced there and note that "cable connected" is enabled. uncheck that option, click OK and observe which network adapter gets disconnected inside the VM. As soona s you find it, just rename it to DomainNet. Check cable connected again and click OK. Remember this tip as you'll do it again with other VMs.

Now double click the DomainNet adapter from above step and go to properties. Select TCP/IPV4. On the general tab, select "use following IP address". Check the image below. You may use the same values. You may also have to change the computer name because the linked clone process creates funny names. I renamed Domain controller to SQLDC (The VM name was SQLDC was all along, but VM name and the actual computer name are not same. I suggest that it be changed to match VM name). Reboot if required and bring it back online.

Configuring Service accounts permissions for AlwaysOn
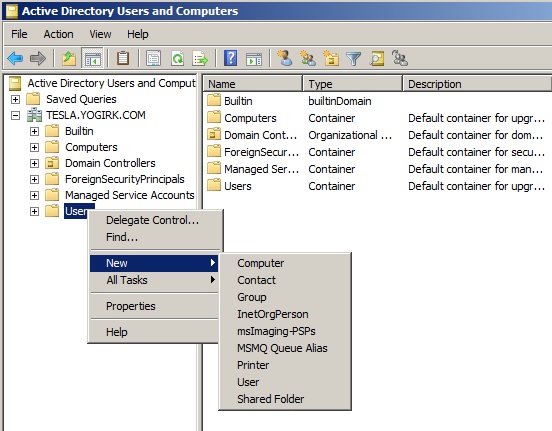
Log on to SQLDC, go to start and type "Active Directory Users and Computers". Create a new user called 'admin', choose a password. Select Password never expires.
Go ahead and make that account a domain admin and you can then use TESLA\admin for configuring cluster, running SQL Services etc. This is only for the sake of simplicity of this demo and to avoid a few extra steps but it is not a good practice on production servers. Each SQL Server service accounts should have only the least necessary access and privileges, nothing more or nothing less.We are now almost done with Domain controller setup.
Joining SQL01, SQL02, SQL03 to the domain
Follow the below steps for each VM.
1. Log on to the VM, find the network adapter that is connected to internal domain network. Recall the cable connected / unplug trick.
2. Rename the adapter to DomainNet for easier management
3. Go to properties of DomainNet, and configure it to use static IP.
The IP of SQL01 should be 192.168.80.2, SQL02 should be 192.168.80.3, SQL03 should be 192.168.80.4. For each of these VMs, the preferred DNS will be the static IP address of domain controller, i.e 192.168.80.1. I will demonstrate that for SQL01 VM and you can take care of the rest.
Log on to SQL01, if you are booting it first time, it will ask you to create/change password. Login and go to network properties. Using the disable and enable "cable connected" property trick, identify Domain Network adapter and rename it to DomainNet.

From computer properties, change computer name to match the VM name and change domain.

You will be prompted for domain user name and password. Use TESLA\admin, your password.

You will be greeted with a 'welcome to domain' message. And the system will restart. Congrats! you have successfully added SQL01 to the domain. Repeat the same steps for SQL02 and SQL03, the only difference is the static IP and the rest is same.
By now, you should have a fully functioning domain controller, SQLDC and SQL01, SQL02, SQL03 joined to the domain. We can now get down to the interesting stuff.
Installing SQL Server
Start SQL01 VM and login using the domain user TESLA\admin. Go to Devices=> CD/DVD devices => Select SQL Server 2012 installation media ISO from your local machine. This will mount the install media to the VM. Start installing. Repeat this process for SQL02 and SQL03 as well.

The installation of SQL Server is as usual and doesn't require any special steps. Note that we need a regular installation on all three servers, not cluster installation. You can use TESLA\admin as the service account for all three installations. Again, this is not a recommended practice on production, its just that we are trying to make our setup simple by having a single account with enough permissions.
Firewall exceptions
Once you have SQL 2012 installed on SQL01, SQL02 and SQL03 servers, we need to make sure that these three servers can talk to each other. Log on to SQL01 using domain account and go to start => type "fire wall". You should see 'Windows Firewall With Advanced Security'. Click on it.Click on inbound rule and create a new rule for SQL Server. Select Program for rule type, and add the path %ProgramFiles%\Microsoft SQL Server\MSSQL11.MSSQLSERVER\MSSQL\Binn\sqlservr.exe to program path field. Select "Allow Connection" on the next screen. Click next and give the rule a meaningful name like "SQL Server Path". Follow similar steps to also add firewall exception on port 1433. In my tests, I found that TCP/IP network protocol is not enabled by default on SQL Server 2012 installations. So make sure that you enable TCP/IP from SQL Server configuration manager. Repeat the same steps for SQL02 and SQL03.


You should now be able to open SSMS on SQL01 and connect to SQL02, SQL03. Since we used TESLA\admin as the account while performing the initial installations and since I added TESLA\admin as SQL admin on each instance, we don't have to worry about configuring logins. But on production systems, you might have to.
Create Cluster
SQL Server 2012 AlwaysON groups is built on Windows Failover Clustering Services platform(WFCS) and that is why we enabled that feature on our base VM in the beginning. It is now time to create a cluster. Make sure all your servers VMs are running (If running multiple virtualbox windows annoys you, you might want to run VMs in headless mode. Check this post for details). Log on to your primary SQL Server SQL01. Go to start, type "cluster". You'll see Failover Cluster Manager. Launch it. Right click on Cluster Manager and Create a Cluster

Type the name of the primary SQL Server and click add. In this case, it is SQL01.TESLA.YOGIRK.COM

Click next and select Run configuration validation tests in the next window. After a couple of screens, select Run All Tests.

You should see the confirmation like below if everything went according to the plan.

On the next screen, give a name to your cluster. I named mine KOALEMOS (Koalemos is the Greek god of stupidity and foolishness. Greeks had a God for stupidity too - how cool is that!). After the name, choose a Static IP for your cluster. I chose 192.168.80.10 click next and next.

Go to Failover Cluster Manager and select our newly created cluster and locate Cluster Core Resources.

It should be up and running.

Now that our Cluster is online, lets add the other nodes - SQL02 and SQL03. Follow screenshots below:


It will run validation tests and it should pass the validation tests successfully. If it fails while doing IP validation tests, dont worry. I faced that situation during my initial configuration and I spent about a complete day trying to figure out what went wrong. Since we created these machines from the same base VM, it may report some of the IPs as duplicate. The best way to solve it is, remove Windows Failover Clustering Service feature on SQL02 and SQL03, reboot the VMs, add WSFC feature again and add the nodes as I showed above. That will work. Pinky promise. :) When everything goes well, you should finally see all nodes added to the cluster and cluster up and running.

Enable Availability Groups on SQL Server
We have our cluster ready. We now have to enable AlwaysOn Availability Groups at SQL Server level. Follow the steps below for SQL01 and Repeat the same steps on SQL02 and SQL03.
Go to SQL Server configuration manager on SQL01. Go to SQL Services and right click on SQLSERVER(MSSQLSERVER) and go to properties. Enable AlwaysON Availability Groups. Stop Services. Restart Services. Repeat the same for SQL02 and SQL03


Configure AlwaysOn
A couple of things before you dive in. We need a bunch of databases on SQL01 to add to an availability group. Create your own databases or use sample databases from codeplex. We also need a file share between the 3 servers with appropriate permissions for service accounts. I created a share on C drive, SQL01 and gave read/write permissions to TESLA\admin login. The network share is accessible as \\SQL01\Backups
Log on to SQL01 and launch SQL Server Management studio. Right click on AlwaysOn HighAvailability and click New Availability Group Wizard. Select a name for your Availability Group. I called mine AG01. You'll see the list of databases to select from. If select option is grayed out, it means you need to take a full backup and initiate an LSN chain. The rest of the setup is pretty much self explanatory:


Specify SQL02 and SQL03 as replicas. The wizard allows you control on things like whether the replica can be failed over to automatically, whether we will have a synchronous commit and asynchronous commit. In the screenshot below, I chose automatic failover between SQL01 and SQL02 with synchronous commit and readable secondary. What that means is - When something goes wrong and SQL01 goes down, SQL02 becomes primary and when SQL01 comes back, it can be the readable secondary with automatic failover enabled from SQL02. I also chose SQL03 as another secondary with no synchronous commit(possible data loss in the event of a disaster) and I set 'Read Intent-Only' property. Read only workloads like reporting can specify connection intent in their connection strings and their connections will be automagically routed to SQL03. Isn't that cool?

On the next tab, you'll see endpoints configured. AlwaysOn uses mirroring under the hood and it uses end points to propogate transactions between servers. Nothing to change here:

The next tab gives you control over where your scheduled and automated backups run. AlwaysOn lets you offload your backup jobs to one of your secondary servers, so that the production database can continue doing what it is supposed to do - serve the end users.

The next tab, lets you create a listener for this availability group. A listener allows you to deal with this Availability Group as a whole and the clients can connect to the group using this VNN (Virtual Network Name). The end users don't have to worry about what is happening under the hood and which server is the primary and which is a secondary replica. Thats DBA's task. Lets create a Listener. I am going to call it Helicon, the planet of Hari Seldon.

In the next screen, you choose how you would like to configure AlwaysOn. You can initialize it automatically specifying the network share (remember the network share \\SQL01\Backups we created a little while ago?) or you can just skip the initial data synchronization if you prefer doing backup and restore manually.

If everything went according to our plan, you should see this, you are one step away from creating AG.

In the next screen, you can script out all the setup and save it somewhere for deploying again with some changes in future. When you click next, the wizard will run and it may take some time depending on your database sizes to complete. If it completes successfully, Congratulations! you have built your home lab and deployed AlwaysOn successfully.

You can directly connect to your Availability Group using the listener name, Helicon in SSMS.

I am not going to test failover and dig deeper into AlwaysOn as this post is already very long. Lets save that future posts.
If you get stuck with the setup somewhere, please leave a comment here and I will be glad to help.
Have fun!
Hi Yogirk,
ReplyDeleteHad some quetions on this article you posted, is there a way to reach you via email.
Kind Regards
Diogo Fernandes
I tried configuring this configuration. All went well but the Failover cluster validation failed
ReplyDeleteI have tried removing and reinstalling Windows Failover Clustering Service feature but still same issue. I tried recreating the cluster also. Got some priviledge errors and space errors.
ReplyDeleteHow much free space will be required on the drive. Also do we need to add the domain admin user in the local administrator group of the other servers.
Let me know please.